
How to upload cryoSPARC particle stacks into COSMIC²
To help understand how to upload cryoSPARC-extracted stacks into COSMIC2, we have prepared the following information from the T20S tutorial (EMPIAR-10025, Campbell et al. 2015).
Summary: To upload a cryoSPARC stack, convert a .cs file and place it into the extract cryoSPARC job directory. Then upload using Globus.
Step 1: How to access tutorial data for COSMIC²
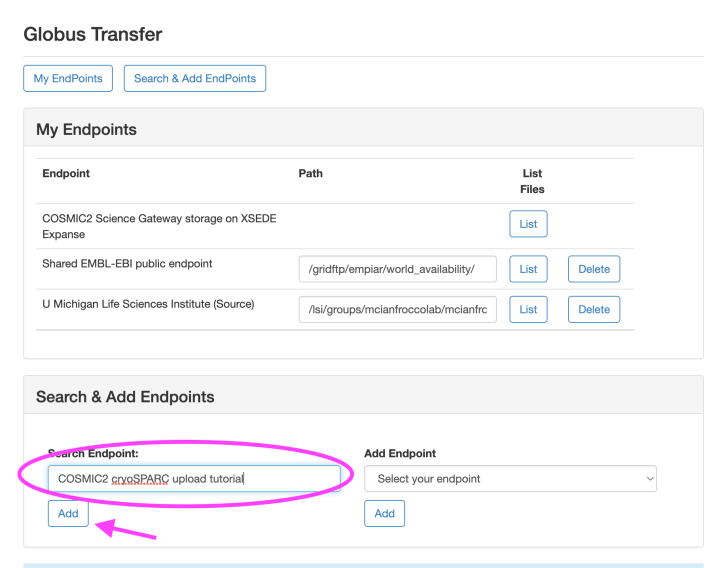
We have publicly shared the tutorial data on Globus (more info on Globus here). Search for the endpoint ‘COSMIC2 cryoSPARC upload tutorial’ and click ‘Add’ to add your endpoint list:
 Now that you added it, you can list the shared endpoint contents by navigating to ‘My endpoints’ and then clicking ‘List’ next to the endpoint name ‘COSMIC2 tutorial’:
 NOTE: You’ll see that the Source Endpoint is listed as COSMIC2 tutorial (the data you want to upload) where as the Destination Endpoint is listed as the COSMIC2 Science Gateway on XSEDE Comet.
Step 2: Convert .cs file to .star format & place in cryoSPARC extract directory
On your local machine, identify which .cs file you want to use as your particle stack meta data file. Typically this is the resulting .cs file from a 2D or 3D classification or 3D refinement. Convert this .cs file to .star format using pyem. You can use the pyem tool on COSMIC2.
Place this .star file into the extract job directory associated with the refinement. For example, if you have J37 as your Extract job but you ran a homogenous refinement in J50, you would put the converted .star file from J50 into J37 folder. This is because the J37 folder has the actual particle stack, whereas the refinement job was just reading the particles from J37.
Step 3: Upload tutorial particle stack
Using this endpoint, you can see what files we have in the extract directory from cryoSPARC:

You’ll see that there is a file called ‘cryosparc_P71_J50_005_particles.cs‘ file along with ‘cryosparc_P71_J50_005_particles.star’. cryosparc_P71_J50_005_particles.star is the converted file from homogenous refinement J50.
Select the entire directory for upload & click ‘transfer’:
 After you click transfer you can monitor the Transfer Status tab to watch your job status.
When the job is successfully uploaded, you’ll see the files listed on the data menu:
 Click here to watch a video walking you through the upload process for RELION stacks: